How to Change Your Mac Startup Disk? 6 Easy Steps!
If you’re a Mac user, chances are that you may need to change your mac startup disk at some point in time. This is the disk that your computer boots from when you turn it on, and it’s also the disk that contains your operating system and other important files. But this is the default startup disk. Your mac can also start from another disk, such as a USB flash drive, network volume, or an external drive. Changing your startup disk is a relatively simple process that can be done in just a few steps.
Before you start, make sure that you have additional security features from the Startup Security Utility if you own an Apple T2 Security Chip.
6 Easy Steps to Change Your Mac Startup Disk!
1. Change Mac Startup Disk Step 1: Restart your Mac in Recovery Mode
The first thing you have to do to change your mac startup disk is to start it in recovery mode. To restart your Mac in Recovery Mode, first shut down your Mac. Then, press and hold the Command + R keys on your keyboard as you turn your Mac back on. Keep pressing down these 2 keys till the Apple logo or a spinning globe is visible on the screen.
This will boot your Mac into Recovery Mode, which is a special mode that allows you to perform maintenance tasks and troubleshoot problems with your Mac.
2. Change Mac Startup Disk Step 2: Open Disk Utility
When you enter Recovery Mode, you will be able to see the macOS Utilities window. Now select “Disk Utility” & click on “Continue.”
Disk Utility is a built-in tool on your Mac that allows you to manage and manipulate disks and volumes. You can use it to select and set the new startup disk.
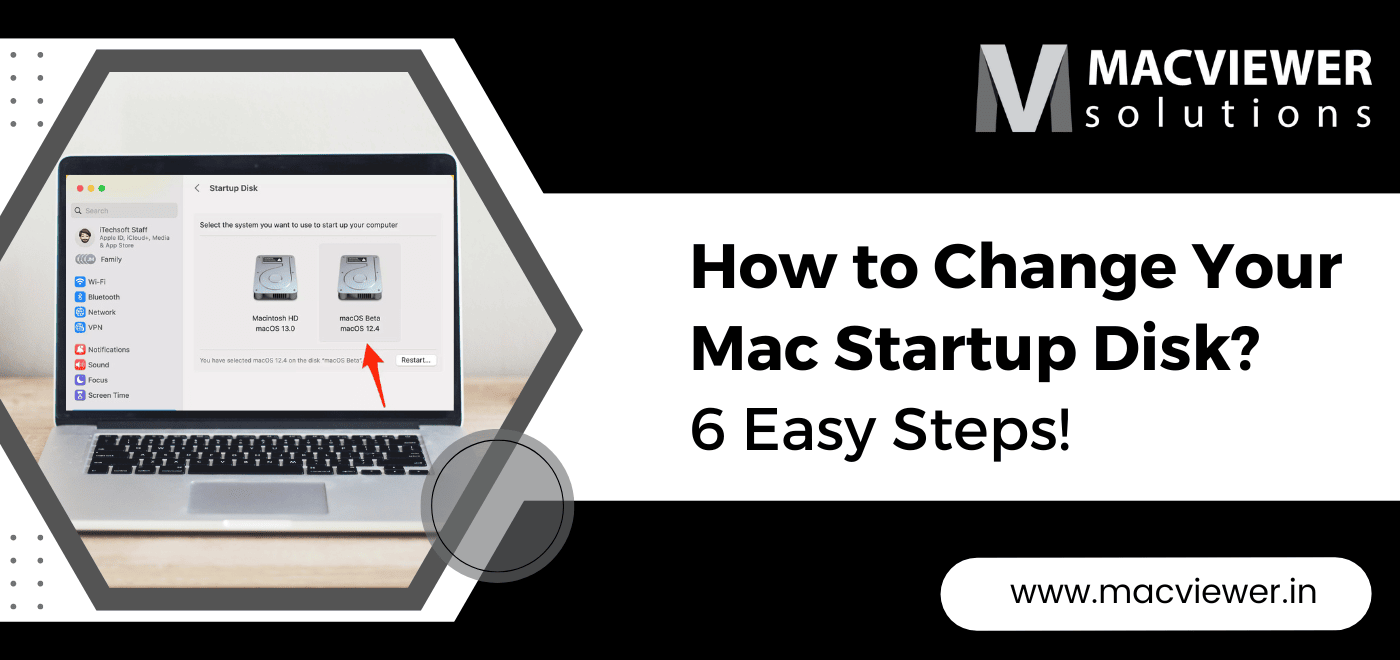
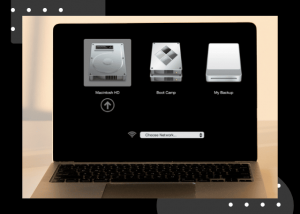
3. Change Mac Startup Disk Step 3: Select Your Startup Disk
In Disk Utility, you’ll see a list of all the disks connected to your Mac. You’ll want to select the disk that you want to use as your new startup disk.
To do this, first, click on the disk in the list on the left-hand side of the window. This will select the disk, and you’ll see information about the disk in the main part of the window.
Note that you’ll want to select the actual disk, not just a partition on the disk. The disk you select will be erased and used as the new startup disk, so do make sure you’ve selected the correct one.
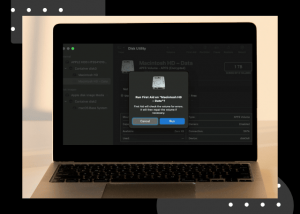
4. Change Mac Startup Disk Step 4: Erase the Disk (Optional)
If you’re using a new or empty disk as your startup disk, you may need to erase it first. To do this, select the disk in Disk Utility, then click the “Erase” button at the top of the window.
In the Erase dialog box, give the disk a name, select a format, and choose a scheme. The format should be “Mac OS Extended (Journaled)” or “APFS” if you’re running macOS High Sierra or later. The scheme should be “GUID Partition Map” unless you’re using the disk for a different purpose.
Once you’ve made your selections, click “Erase” to erase the disk. Note that erasing the disk will permanently delete all data on it, so be sure to back up any important files before proceeding.
5. Change Mac Startup Disk Step 5: Set the new startup disk
Once you’ve selected your new startup disk, click the “Set as Startup Disk” button at the top of the window.
You’ll see a message asking you to confirm that you want to set this disk as your startup disk. Read the message carefully, and make sure you’ve selected the correct disk.
If you’re sure you want to proceed, click “Restart” to confirm. Your Mac will restart, and should now boot from the new startup disk you selected.
6. Change Mac Startup Disk Step 6: Restart your Mac
After you’ve set your new startup disk, restart your Mac to ensure that it boots from the new disk. If everything was done correctly, your Mac should now boot from the new startup disk that you selected.

Conclusion
And that’s it! These are the steps for changing a mac startup disk. Remember to back up any important files before erasing a disk, and double-check that you’ve selected the correct disk before setting it as the new startup disk.
For any other device-related problems, you can contact Macviewer, an expert repair and rental center in Pune/the PCMC area. Check out the rest of our blogs here!
Vilas March 19, 2023 Laptop tips & tricks, Laptop